Monday, September 14, 2009

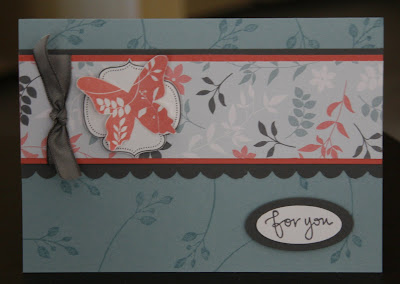
Tri-Shutter for Mum

Here's the card I made for my mother's birthday on the weekend.


Mum loves blue so I used lots of Baja Breeze! Mum also likes things not to be too overdone so I tried not to completely cover up all the beautiful DSP.

Stamps: Oval All, Heartfelt Thanks

Inks: Baja Breeze, Chocolate Chip

Paper: Parisian Breeze DSP, Baja Breeze textured and plain, Choc Chip, Whisper White
Accessories: Baja Breeze Corduroy Buttons, Pretties Kit Flowers and half pearl, Button Latte white button, Rhinestome Brads, Flower Fusion Too felt flowers, Build-a-brads Pewter, Linen Thread

Tools: Large Oval and Scallop Oval punches, 1/2 inch circle punch (for build-a-brad) Aquapainter (for colouring pretties flower)

Wednesday, September 9, 2009

Toby's Hospital Visit

What an action packed couple of days we've had!

I had planned to post pictures of the cards we were making at my Monday Night Masterclass but unfortunately I had to cancel the class at the last minute. I will post pics though after I've rescheduled the class.

On Monday morning I took the boys to the GP to have a look at Toby (my 3yr old) who was a bit "wheezy". Upon examining him the GP put him straight onto a nebuliser and called an ambulance!!

By the time the ambos arrived Toby's breathing was much better and there was much debate about how to get him to the hospital. The ambulance was apparently unable to transport all 3 of us (myself, Toby and Owen who is 16 months) due to lack of safe restraints. In the end it was decided that since his breathing was really pretty good I would drive them to the Royal Children's Hospital myself. Toby was a bit disappointed he didn't get to ride in the ambulance! Kids!

So we arrived at the emergency department and they gave him more ventilin and steroids. We were not allowed to leave the hospital until he could last 3 hours without Ventilin. He kept making it to about 2 hours and in the end we had to stay overnight. As you can imagine it was really not fun. Those recliner chairs may look comfy but they are really not nice to sleep in!
Not that I got much sleeping done - Emergency departments are sure noisy in the middle of the night! LOL!

We were finally able to leave around 10.30am the next day (Tuesday). Toby is now perfectly fine but we've been sent home with an Asthma management plan (even though he's not actually been diagnosed with Asthma yet) and a Ventilin Puffer.

So sorry there are no pics from my Monday night class but I promise I'll post them once we've rescheduled. And thank you to the ladies who were so understanding about the cancellation.

Monday, September 7, 2009

Christmas Charity Workshops

If you would like more information on these events please contact me.

Oval All Thanks

Here a couple of the little Thank You cards I like to pop in with orders for my lovely customers.

They are 3 x 3 inches - just the right size for a little note of thanks.
Stamps: Oval All
Inks: Baja Breeze
Paper: Baja Breeze (textured), Basic Grey, Walk in the Park DSP
Accessories: Dazzling Diamonds Glitter and 2-Way Glue Pen
Tools: Scallop Oval Punch


Stamps: Oval All
Inks: Basic Grey, Pink Pirouette (to colour butterfly)
Paper: Pink Pirouette (textured), Basic Grey, Patterns Hostess Pack
Accessories: Dazzling Diamonds Glitter and 2-Way Glue pen, Blender Pen(to colour butterfly)
Tools: Large Oval Punch, Scallop Oval Punch

Sunday, September 6, 2009

Father's Day '09

Here is the card design I used for both my father and father-in-law this year for Father's Day:

Stamps: Seaside, Life Definitions
Inks: Sahara Sand, Chocolate Chip
Papers: Whisper White, Sahara Sand (textured), Chocolate Chip
Accessories: Nil
Tools: Mat Pack and Paper Piercer

Saturday, September 5, 2009

Spring Mini Make and Take

This card was part of my Spring Mini Catalogue Workshop last month.
Stamps: Great Friend
Inks: Basic Grey, Cameo Coral, Baja Breeze
Papers: Baja Breeze, Cameo Coral, Basic Grey, Whisper White, Walk in the Park DSP
Accessories: Basic Grey Taffeta ribbon
Tools: Scallop Edge Punch, Large and Small Oval Punches

Birthday card for FIL

FIL stands for Father-In-Law in case you didn't know! LOL!

This is the card I made for my husband's father last month for his birthday.

I was really happy with how this turned out. It was my first attempt at the "faux wood grain" technique.

Faux woodgrain is actually REALLY easy to do! You just need a piece of More Mustard cardstock and some ink pads. You simply drag the ink pads directly over the cardstock!
I started with the More Mustard ink pad, followed by Close to Cocoa and then a little Chocolate Chip. Lastly a little bit of Whisper White craft ink. Just be careful with that - you don't want to use too much. And just go gently - you don't want the other colours ending up in your white pad.

The circle sentiment was done using the "faux metal" techinique. You can see a tutorial I've done on it HERE.

The saw was stamped in Basic Brown ink onto Watercolour paper and watercoloured with the Neutrals Markers and an Aquapainter.

Friday, September 4, 2009

Watercolouring - what NOT to do!

Here's a card I've been demostrating at my recent workshops:

Sorry it's blurry - I didn't realise it until I'd uploaded and unfortunately I don't have another (and am too lazy to go take another one! LOL!)


This close up is of another copy I made of the same card. I used it as a case-in-point of what happens if you don't let one colour dry before you add another colour. One of the workshop participants had a great idea - rather than call it a mistake she said it looks like a bit of "atmospheric burn"! I like it!

Stamps: Pun Fun, Classic Stars Jumbo Wheel
Inks: Riding Hood Red, Pacific Point, Staz-On Black
Papers: Riding Hood Red, Pacific Point, Watercolour Paper
Accessories: Hemp Twine
Tools: Aquapainter, Crimper

Urban Scrapbooking Pages

Another event I held recently was a scrapbooking class. The event was an all day affair. We had a lovely time with lunch and afternoon tea included.

The ladies who attended did a BEAUTIFUL job on their pages and enjoyed learning some ways to use chipboard in their layouts.

I was a bit run off my feet on the day and didn't get time to take photos but here are some pics of the actual pages I designed for them to make. (I must give credit to my good friend and downline member Robyn for her helpful advice when I was a bit stuck on a couple of the pages - thanks Robyn!!)


If you'd like me to run another session on making these pages, gather a few friends together and we can book a date!

Fresh Inspirations Workshop wrap up

Waaaay back in June our Paper Angels group help a half-day cardmaking workshop which we entitled "Fresh Inspirations".

The attendees received the Fresh Cuts stamp set and made 4 fabulous cards. (which I just realised I don't have a photo of! aarrgghh! Will take one tomorrow and edit to add)

A fabulous day was had by all and at our Pine Rivers venue we raised close to $700 for our chosen charity - the Mater Mothers Bereavement Support Program. (you can read more about it HERE)

Stampin' Up! is always generously supportive of our charity fund-raising efforts and supplied us with lots of lovely product for our raffles. Here's a pic of my Mum and I on the day. Mum always seems to manage to win a raffle prize or a competition prize at our events. I promise it's not rigged! LOL!

Apologies

Firstly, let me apologise for the appaling lack of blog posts over the last month or so.

Somehow blogging kept getting pushed way down to the bottom of my to-do list. There always seems to be something more urgent/important that needs doing. (and sometimes I was just tired and couldn't be bothered!)

I'm going to make an effort to just get in there and blog! So here I go - I have a few posts I need to get on the blog so hopefully you will all forgive me and start reading my blog again!

Bec.

Tuesday, September 1, 2009

Sunday, July 19, 2009

Urban Scrapbooking event

Please click for a closer view of this flyer. If you are unable to view, please Email me and I will send it to you.

Post It Note Holder Instructions

As promised (hello to the ladies from my Dayboro workshop!), here are the instructions/measurements for the Post It Note Holder I've been demonstrating at my workshops this month:


Cut a piece of cardstock to 9cm x 21cm. (You can get 3 of these from an A4 sheet.) Score at 9cm, 10cm and 11cm from one end.

Fold along score lines to create a "W" shape.
Fold back on itself (I don't know how else to word it!) so that you just see the middle fold. Cut two snips up to the score line.
Fold back out again to create the shape of the post it holder. Pop out the part that you snipped so that it sits out and creates the pen holder. Use some SNAIL or sticky strip to adhere the fold together.
Add a 3 inch square of DSP. This one is Bella Rose and the base is Riding Hood Red.

Add some ribbon. This one is the Kiwi Kiss / Vanilla Satin Ribbon.
Add some embellishments on top! Here I have stamped a flower from the Eastern Blooms set in Riding Hood Red, cut them out, added a green rhinestone brad to each centre (from the "ice" set of brads) and popped up on dimensionals. The squares beneath are 4.5 and 5cm squares in whisper white and kiwi kiss.

Thursday, June 11, 2009

Bell's Birthday Gifts

It was my sister-in-law (and team member) Bell's birthday yesterday. I've finally given her the gifts I made so now I can post pics of them!
This is a jar I bought a while ago which I thought would be great for putting rub-ons onto and filling with choccies or biscuits etc. Well, I had a bit of trouble at first, getting the rub-ons to actually stick! They are usually so easy to apply and stick to everything. I don't know what it was about this jar but it was giving me trouble. My wonderful team member Rel suggested I give it a rub over with my sanding block - hey presto! It worked!! The rub-ons were very easy to apply after that and the sanding block didn't damage the glass at all - no scratches or anything!


The card was really easy to do. It is a pre-cut and scored mini note card with matching envelope. I used rub-ons again, this time from the Bright Delights collection and added some felt flowers and brads over the top. I also put some rub-ons on the envelope to match.


I made a cute little post-it note holder for her as well. It was inspired by the one you see below.
This one was given to me by my lovely upline Liz at a meeting recently. It, in turn, was inspired by some swaps we received at Convention in May.
Unfortunately there are no details on the back of this swap. If you recognise this as your swap or someone you know, please let me know so I can give proper credit. Isn't this owl just so cute??

If you would like to learn how to make these little cuties, just contact me to book a free workshop.

Wednesday, June 10, 2009

Fabulous Deal for Hostesses

Check out this great Hostess special:
Host a workshop in June or July with sales of $600 or more and receive an EXTRA $40 to spend!!

This means if your workshop totals $600 you receive:
*A level 1 OR level 2 stamp set
*$110 to spend!

Contact me today to book your workshop.

Don't have time to host a workshop? How about a "catalogue party"? Pass a catalogue around to your friends and collect their orders. You receive all the same hostess benefits as if you hosted a workshop in your home. Contact me to find out more.

Friday, June 5, 2009

Pocket Card with DSP

Here's my final entry for Liz's challenge:

This time I decided to actually challenge myself! The first 2 cards were easy to make - that spotty design on the DSP is fun to work with.

I decided I needed to try and use a pattern that I didn't necesarily love...and here's what I came up with. I stuck to just the 2 colours to keep it simple. The pattern is already busy so I didn't want busy colours as well.

Stamps: Sincere Salutations, Frames with a Flourish
Inks: Chocolate Chip
Papers: Good Morning Sunshine DSP, Summer Sun, Chocolate Chip, Whisper White
Accessories: Choc Chip grosgrain (wide and narrow), Jumbo Eyelet,
Tools: Scallop Edge Punch, Corner Rounder Punch, Round Tab Punch, Cropadile, 1/2 inch circle punch (for the corners of the frame).

Rolling Bug

Here's another of the cards I made for Liz's challenge.


This time I made a spinner card. I got the instruction from Splitcoast Stampers AGES ago so just did one by memory. It still worked!

The bug has dimensionals and a couple of 5 cent pieces on the back to help it roll across the card. The space it rolls through was created with the Word Window punch - punched a couple of times to create an extra long window.

The words were stamped by inking one or 2 words at a time and using the stamp-a-ma-jig to positioin them. On the word stamp, the words are not all in one line, they are on 3 lines so I had to fiddle around to get them to look like this.

I've sponged all the edges of the cardstock and DSP with Old Olive ink and put Crystal Effects on the bug.

Stamps: Bugs and Kisses
Inks: Old Olive, Pacific Point
Papers: Good Morning Sunshine DSP, Old Olive, Whisper White
Accessories: Pacific Point ribbon, Crystal Effects
Tools: Circle punches, Word Window punch

Thursday, June 4, 2009

Summer Daisies

I am totally loving the "Upsy Daisy" stamp set! Here's a card I made for a little challenge my upline Liz was running. We had to make a card using the Good Morning Sunshine DSP. There were some BRILLIANT entries by lots of the Paper Angels team. I'll post pics of my other 2 entries soon.

I used the Eyelet Border punch on the corners of my whisper white to create these decorative corners. Just insert the corner of your paper into the middle of the punch.

The stamp was inked in So Saffron ink, then I daubered Summer Sun onto the middle of the flowers. I used an Old Olive marker for the stems.

Stamps: Upsy Daisy, Short and Sweet
Inks: So Saffron, Summer Sun, Old Olive, Pacific Point
Paper: Old Olive, So Saffron, Whisper White, Pacific Point, Good Morning Sunshine DSP
Accessories: Pacific Point ribbon, Fire Circle Rhinestone brads
Tools: Small and Lage Oval punches, Eyelet Border punch

Apricot Giraffe

Here's a recent 'make and take' from my workshops. This card is super easy and quick to make.

Stamps: Wild About You, Family Phrases
Inks: Tempting Turquoise, Apricot Appeal
Papers: Tempting Turquoise, Kiwi kiss, Whisper White, Patterns Pack II (hostess only)
Accessories: Kiwi Kiss ribbon
Tools: Stapler, Word Window punch

Monday, May 25, 2009

OMG! I scrapbooked!

Just had to share with you some scrapbooking. I have not touched my 3 year old's baby album in soooo long but I finally did a couple of layouts for him. I really need to catch up on my scrapbooking. (Don't we all??) I have it all planned out for my second child - I have kits bought and ready to go! LOL! My main problem is just getting the photos actually printed out! And then sorted out too...

You can't really tell from this photo but the hanky on Toby's head is actually a ginham patter no it matches this paper really well. I've used mostly Stampin' Up! products for these layouts although a lot of it is retired stuff I've stashed away for my personal scrapbooking use.

I just knew that I would need this Au Chocolat papers after they retired! It goes perfectly with this teddy bear layout. You can't see it but I've used textured Very Vanilla cardstock here and it's totally gorgeous in real life.

I haven't added the jounalling yet but I'll get to that eventually! LOL!

Hip-hippo-ray


(Apologies for the poor photography - it has been overcast here for days on end so it's been hard to get a good photo. I ended up just doing it and having to try and adjust the exposure etc.)

This card is one that I have been demonstrating at my recent workshops. I've used this card to show water colouring. I wanted to show people how easy it is to water colour, even when you're not much of an artist. The trick really is to use the proper water colour paper. If you use that, you just can't go wrong! If you're trying to colour on Whisper White there's not as much scope for fixing mistakes. Water colour paper allows you to even remove colour if you need to! It can cope with much more water than Whisper White and this means you can keep going back and adding on extra colour.


Stamps: Pun Fun
Inks: Staz-on Black
Paper: Water colour paper, Basic Grey, Regal Rose, Patterns Pack 2 (hostess level 1)
Accessories: Regal Rose wide grosgrain, Neutrals and Rich Regals Watercolour Wonder Crayons
Tools: Corner Rounder Punch, Aquapainter

Wednesday, May 20, 2009

Owen's First Birthday

Can you believe my little baby is one already?? One of the funny things at Convention this year were the comments from the other Paper Angels about how I was much bigger I looked at LAST year's Convention! Sure I was, 8 and 1/2 months pregnant!!

Owen is such a little character and had very little interest in the whole birthday party ritual. All he wanted to do was play on the grass!

I thought I would share some pics of him on the day and his cake, along with pics of the card I made for him.


I made a pop-up card! I can't remember the last time I made one of these...
Ooh, and did you notice I used BOLD BRIGHTS??? I know! I hardly ever do the Bold Brights thing but hey, I gave it a go!

Stamps: Crazy for Cupcakes, Polkadot background
Inks: Tempting Turquoise, Staz-on Black
Paper: Watercolour paper, Yo Yo Yellow, Gable Green, Whisper White, Lovely Lilac
Accessories: Tempting Turquoise grosgrain, Linen thread, Bold Brights Brads, Watercolour Wonder Crayons (Bold Brights)
Tools: Wide oval punch, Large oval punch, Aquapainter

Monday, May 18, 2009

Mothers Day card from my hubby

Just a quick post to show you the Mothers Day card my husband made for me. He whipped it up while I was having a sleep in on Mothers Day. He raided my stash of scraps and pre-stamped images and this is what he came up with. All he then had to do was colour in the flower. I think he did a great job, especially since he did it on the fly while I was sleeping and he was watching our two little boys!

Patterns Gift Set

My friend Raelene is having a birthday this month so I made her a card and a little gift set.
Here's the card:
Stamps: Short and Sweet, Fun and Fast Notes, Frames with a Flourish
Inks: Basic Grey, Regal Rose, Rose Red, Brocade Blue, Night of Navy, Certainly Celery
Paper: Patterns Pack 2 (hostess only), Basic Grey, Whisper White


The idea for this gift set was inspited by a make and take we did at Convention. The bag is made by placing a piece of double sided DSP in a cello bag and punching out a handle with the Word Window punch.

Before I posted the gift off to Ralene I popped in a White Gel Pen so that she can write on the inside of these cards without having to put in another layer of lighter cardstock or paper. The white gel pen show up beautifully on the Basic Grey and the pen looks cute inside the bag too!


Stamps: A Flower for all Season, Short and Sweet
Inks: Basic Grey, Regal Rose, Brocade Blue, Certainly Celery, Close to Cocoa, Apricot Appeal
Paper: Basic Grey, Whisper White, Patterns Pack 2 (hostess only)
Accessories: Cello Bag, Brocade Blue wide grosgrain
Tools: Word Window punch

Wednesday, May 6, 2009

Fabulous Starter Kit Offer


Stampin' Up! is offering a FABULOUS starter kit this month. It will cost you $150 to join (for this month only), but for that, you will get a stamp set ($77.95 value), a Simply Scrappin' Kit, 12x12 Textured cardstock, an inkpad and Craft and Rubber Scissors. That's all worth over $180.

You also get some business supplies to get you started: Idea Book & Catalogue (8), Getting Started DVD, Getting Started Guide, Guest Invitation Postcard (100), To My Hostess Envelope (10), Project Sample Sheet, Recruit Brochures (20), Hostess Brochure (20), Hostess Benefits Form (10), Customer Order Form (50).

If you decide down the track that you no longer wish to continue as a demonstrator there are no penalties. You've paid for your Starter Kit so it is yours to keep.

I provide as much or a little help and support to the ladies in my team as they want or need. If you wish to be a hobby demonstrator you can - you never have to do a workshop if you don't want to. You would still be welcome at all my meetings, classes and other events.
If you wish to be more of a "business" demonstrator I can assist you with information, training and support. I'll even conduct your first workshop for you!

There's room for all kinds of demonstrators in my team.

What are you waiting for? There's nothing to lose so give me a call today! We need to get your paperwork in before the end of May for this special offer. Of course the normal Starter Kit is also available during this time.